As I introduced in my previous homepage, though I bought Kozan, Nikko and Kobai no kagayaki for cash 3,000 yen at Takagi engei in Kanuma city in November 1993, at the same time I paid 30,000 yen for this Juko whose height was 50cm and whose trunk circumference was 20 cm. It was very cheap though all satsuki trees were very expensive at that time because it had been placed in the corner of the shop garden and did not have a lot of branches. It is as a material that I bought it, that is, I was not sure that I would be able to grow it very large. It is because it is said that satsuki trees cannot grow large once they are left alone without good cares.
At first I planted it in a terracotta pot when buying it, and planted it in the nursery to grow it large in November, 1994. Since I always give a lot of water and fertilisers to the trees in the nursery, they grow large quickly: one of the longest shoots of Daigokuden was 96 cm in last February.
And I was very happy to find that a new shoot came from the left side of the second curve of the trunk in about 1999 and dug out and transplanted it with other satsuki trees in the nursery in 2002 when I asked my brother to pile the concrete blocks and make the large frames of flower beds on the ground which consisted of Kanuma soil, and throw a lot of Kanuma soil there.
And other good new shoot came from the left side of the second curve of the trunk in 2004. Therefore I had been unable to decide which one I should keep of these good shoots for a long time, but suddenly I had a good idea in my brain, that is, I decided to bind them with wires to make them into a branch in 2006. And I removed the wire in 2008 and wired them again.
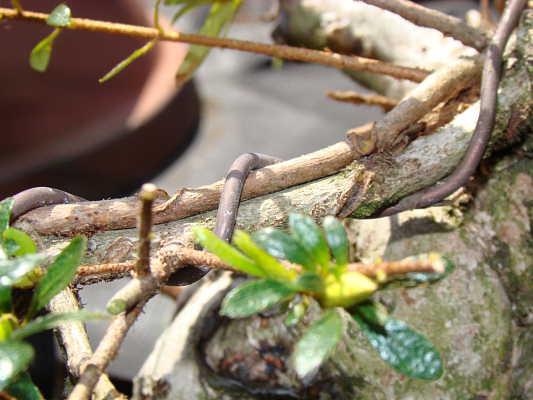
The photo was taken on April 7th, 2009.
When I succeeded in it in spring 2012, I judged that this tree had a good arrangement of branches as bonsai. And I pruned it drastically on February 5th, 2014 except some long shoots to graft two on the two branches and dug it out from the nursery on March 15th and planted it in the bonsai pot after washing the roots with jet water on 18th.
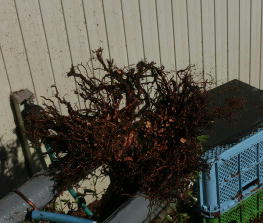
B. After pruning in the nursery
Judging from the photo of this tree which was pruned drastically on February 5th, you can understand that the first branch is short. I cut it short when pruning the tree drastically because it was considerably straight, and cut the first back branch short, too, because of the same reason. But since the left second branch has become rather thick, the whole figure of this tree as a basic style is good though I have to make the first branch so long that it may become a sashieda (the largest branch).
The photo was taken on March 16th, 2014.
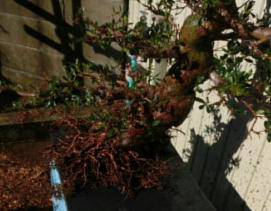
C. The nebari (rootage) after washing the roots with jet water
Judging from the nebari of this tree after washing the roots with jet water, you can see that it has a rather good nebari though the root ball was very thick immediately after it had been dug out from the nursery. I think it is because I arranged the roots after I had removed the soil and washed the roots with jet water and planted it in the terracotta pot in 1993. And I planted it in the nursery in November 1994 and transplanted it in 2002.
Here you can understand that it is the most important working to wash and arrange the roots before planting some satsuki trees in the nursery to make the trunk circumferences of the trees thicker without several thick vertical roots and make them have good nebari. It is the same in case of planting them in pots.
The photo was taken on March 18th, 2014.
D. The bottom of rootage
Though I removed several thick vertical roots, you cannot see any cut ends of them under the trunk. This is the reason why this Juko had a thicker trunk circumference than I had expected. But if it had had a lot of very thick rambling roots which had spread in the surface soil in the nursery, it would have had much thicker trunk circumference than it has now.
Therefore though I had to transplant all trees in the nursery every 5 years to cut the vertical thick roots, I could not do so because I had a lot of them and had a regular job at our university. Besides, because I had not wanted to grow them to get a lot of money since I had begun to grow them, I did not ask some persons to transplant the trees in the nursery and pay a lot of money to them, that is, I have to take care of all trees in our gardens by myself because I began to grow them to improve my health. But sometimes I asked a friend of mine to help me to repot very large satsuki trees in March. It is because I could not finish repotting them by the start of lectures in April when we had a lot of rainy days at the end of March.

The photo was taken on March 18th, 2014.
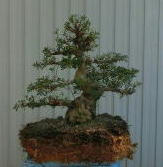
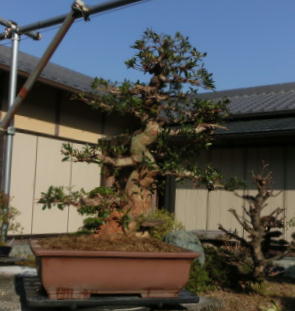
E. This is the whole figure of Juko which is seen from the front side.
This Juko has the very good taper of trunk and the considerably good arrangements of branches. And after planting it in the bonsai pot, I grafted a long shoot on the left second branch which I had made by binding two branches with wires, and a long shoot on the back first branch. In the past, sometimes I broke the shoots which I had grafted on the trunks and branches while washing the roots or planting the satsuki trees. Regretting these errors, I decided that I had better wire some shoots to graft before removing the soil lest I should break them while repotting satsuki trees.
After grafting two shoots, I think that this Juko has the whole figure which will be expected to be a good bonsai in several years.
I am sure that this Cantonese pot for which I paid 45,000 yen several years ago will be suitable for the flowers of Juko when it has them. Now in Japan Cantonese pots are very popular because the colour is good and cheap.

The height is 58 cm. The trunk circumference is 47 cm. The pot is 52 x 41 x 14 cm. The photo was taken on March 18th, 2014.
Section 2. Mibu no hana
A. A short history of this Mibu no hana
I bought this Mibu no hana for 7,000 yen as the tree to plant in the nursery at Yamaka engei in Kanuma city in November 1990. Being a very new variety at that time, it was expensive. But since the height was 69 cm and the trunk circumference was 4 cm, I could buy it at a considerably lower price because Mr Nishiyama, a member of the same satsuki society, had bought a lot of satsuki trees for a long time from the shop.
Some years after planting a lot of young trees in the nursery I had a serious error. A lot of weeds always bothered me so much that I sprayed a very strong herbicide even near them. And it caused me a miserable result that more than one thirds of them died in a half year to some years. But fortunately this Mibu no hana is one of these threes which lived through the great damage.
About 12 years ago when we built the new house, all trees in the nursery were transplanted. It is because I asked my brother and his wife to help me to pile two old blocks on the fields of Kanuma soil, throw about 400 bags of Kanuma soil in the frames to make three long ridges (1.6 m x 15.3 m) and a short ridge (1.6 m x 6.3 m) and plant them there.
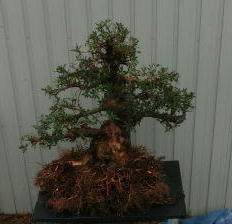
B. After pruning in the nursery
I pruned this tree in the nursery on February 5th, 2014 so drastically that it was easy to remove the soil, wash the roots with jet water and plant it in the bonsai pot. Judging from the photo of this tree after it had been dug out from the nursery, it has a considerably good arrangement of branches. But judging from the root ball, it is clear that it does not have a good nebari.
The photo was taken on March 16th, 2014.
C. The bottom of rootage
Apparently one part of the bottom of the trunk does not have any good thick roots. It is the biggest defect of this tree. Therefore I have to draft a shoot or a sapling on that part in the future. If you can graft some saplings on the parts where some satsuki trees lack in roots, you will have no problem even if you bought araki which did not have good nebari. And by grafting you can make some branches on the parts where some trees need some branches. But you cannot reform the curves of the trunks if the trees are thick. Therefore you have to choose the good style of the trunks when you would like to buy thick satsuki trees.
The photo was taken on March 21st, 2014.
D. After washing the roots
Since this tree does not have a good nebari, it cannot stand upright by itself. Therefore it is very difficult to plant it in the bonsai pot: to fasten it with the bonsai pot. Besides it is so tall and heavy that you had better ask one of your friends to help you to plant it in the bonsai pot.
When I had to plant it in the bonsai pot by myself, I piled the Kanuma soil much higher on the right part of the centre of this tree than the average and fastened the thick root of the bottom of the trunk on the left side fixedly with wires from the bottom hole. And I sank down the trunk on the right side and fastened it with wires if it got the suitable position of the figure. If I think it does not have it, I have to adjust the position by adding Kanuma soil under the roots of right side or removing it from there.
The photo was taken on March 21st, 2014.
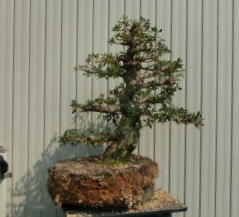
E. This is the whole figure of Mibu no hana which is seen from the front.
After planting this tree in the large bonsai pot, I judged that it had a good position and gave a lot of water to it till the clean water poured from the holes of the pot. But as you can understand, the position of it seems to be a little bit leaning to the right side. It is because the heavy weight of it pressed Kanuma soil on the right side strongly by having been given a lot of water. Though I always tighten up the wires again after giving a lot of water to the trees and correct the positions of them, in this case I could not do nothing to correct it because it is a very heavy slanted trunk. When I repot it next time, I will be able to correct it and to plant it a little bit nearer to the left side of the pot. Now, what I have to do next year is to graft some saplings on the branches if it will have long shoots.
Judging from the photo of it, each branch is much thinner than those of my other thick-trunked satsuki trees. Therefore I think that they will be more suitable to the thickness of the trunk in the near future, and that it will be easy for me to make good branch pads hence forth.
Perhaps I paid about 38,000 yen for this bonsai pot about three years ago. Though it is very large, it was much cheaper than I thought. But I do not like the colour of it very much.
The height is 43 cm. The trunk circumference is 38 cm. The pot is 45 x 34 x 12 cm. The photo was taken on March 23rd, 2014.
If you would like to understand what Mack is a little more, please click here.
If you have any suggestions or impressions about my home page, please send your e-mail about them to my e-mail address.
Then I will
surely answer them.